August 8, 2015

Ya Can't Forget the Birthdays!

I have to admit that I did a HUGE disservice to my kids last year when it came to their birthdays. I didn't really do anything for them other than have the class sing the Happy Birthday song to them during Morning Meeting. I was in a lot of pain last year and a lot of things went to the way side. Things I hope to improve on this year!

I remember one of my teamies last year having something like this -- maybe exactly like this and thought that's really cool and it's finished. I found the idea on  Tunstall's Teaching. She got her Happy Birthday balloon templates at the What the Teacher Wants blog site. I love her, she has some AWESOME fonts!

Well, I didn't order or buy the large pixie sticks, but used the smaller ones that I bought from the candy isle. I'm sure the parents will thank me for this. I decided on these smaller ones, because the kids are also going to get a card, a Happy Birthday sticker, and a Happy Birthday cootie catcher. They are on sale right now! 30 catchers for $1.50. Wowza!! I thought the cootie catcher would be great fun for them to take home and play with family.

Since I used the smaller ones, I printed them smaller. If you have an Apple computer and use Preview, I'm going to teach you a helpful tech tip where you can print 6 to a page (even the tho the graphic says 9--I used 6) and then they fit perfectly on the pixie sticks. Once the template is open and you are ready to print on the dialogue menu, choose how many to print per page. It's that simple...but it's a wonderful timesaver.

I used SOOKWANG tape to affix the balloons to the pixie sticks. It works better, much better, than tape. I covered the little plastic container with paper and then stamped some Happy Birthday stuff from my Stampin' UP collection

Another project done before school starts, but one that will make each one of my students feel special during the year! :)  LOVE THAT - Jessica


Glue Bottles!!

What they don't teach you in college is A LOT! :)

I despise liquid glue. The kids don't close them all the way, glue leaks, they use too much, and the clogging!!!  Well, I'm talking to my BFF (who teaches 1st grade) and she says she put petroleum jelly in her glue tops and had NO clogging all year.  Wow! That's something worth trying.

At the TEKS Conference, I took a foldable class. It was taught by one of Dinah Zike's trainers, Nancy Wisker. She was AMAZING. She had a tip of using the tiny bottles for primary learners because they are easier to grip and easier to control the flow of glue. She had also used one of those silicon holders for the antibacterial lotion on her lanyard and stuffed one of these glue bottles in it instead. GENIUS! She taught me a cute phrase to use with the kids as well: "Yaba Daba Doo, too much glue!"  Cute, right?

So there are all these great tips out there and I'm going to share them with you!

I bought 24 1.25 oz bottles from Dick Blick Art Supplies.  They cost me about .82¢ each. Another great tip from Nancy Wisker.

materials
Materials
Gather your materials:

Glue Bottles
Pliers
Petroleum Jelly
Cotton Swabs
Duct Tape (optional)

The first thing I did was cover my glue bottles with the fun duct tape. I love duct tape. It helps identify which bottles are mine. :)  I also cover my computer accessories in duct tape as well.


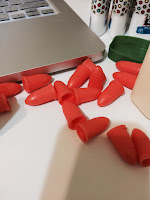
glue tipsNext, you open the orange glue bottle top as far as it goes and use the pliers to help you pull straight up. They just pop off! It's amazing. 

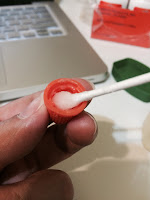
jelly in topsI have heard that some are able to just pull them straight up; I am not that talented so I used the pliers. You'll be thankful for the pliers when parts of your hands and fingers are all slippery from the petroleum. 

I used cotton swabs to rub a thin layer first on the inside of the tops and then put in a glob of jelly in each top. After, I popped the tops back on the bottle. This was fairly easy and then turned and closed them shut.

I also add a healthy amount to the inside cap threads since I will be opening and refilling these bottles periodically.  I twisted the tops back on tightly and kept on rolling until they were all done.

I am hoping for smooth gluing at least half the year. Actually, I'm secretly wishing that they last the whole year, but if I only have to redo this at break...I will be in heaven.  

I'm so happy to find these solutions/experiments so that we can do foldables, interactive notebooks, and art experiments with little heartache and headache.  I made glue sponges last year (read all about it on Kinder Smorgasboard) and they worked like a dream, but they have to share with someone else and I might still use those in my writing center or for larger art projects.

Here's the finished products. :) Excited and pumped to get the creativity flowing. I hope some of you consider doing these fun and easy project yourselves and we'll all have less sticky years of gluing to come!
Love, Jessica


August 4, 2015

Comic Life 3

Hello and good evening! I am presenting Comic Life 3 tomorrow...showing the application and really talking about how 1st - 5th can use the application to create original products, collect, analyze, and represent data, draft, edit, & publish digital products...and SO MUCH MORE!!

Here is a brainstorm I had about uses for ComicLife in the primary 1st & 2nd grade classroom:
Timelines
Alliteration
Historical Figures
How - To
Sentence Types
Character Analysis

I have this idea swimming in my brain that you could do these whole class, modify using BlockPosters, then print and hang as anchor charts. I will let you know how that goes!

Here's my handout for tomorrow. It's nothing to call home about, but it's something. I'm exhausted and feel like I'm already back at work. Time to eat and recharge.   Keep thinking and learning! Jessica